Chef Loryn’s Chicken Pot Pie – Madison, NJ

March 26th, 2010

Chef Loryn’s Cafe and Catering
250 Main Street
Madison, NJ
Phone: 973-520-8703

http://www.chefloryns.com/

Chef Loryn's Chicken Pot Pie

Yesterday was the seventh day that I had been sick with the mother of all head colds. I had eaten soup every single day for those seven days. As much as I love soup, I had absolutely had it. No more soup for me. I was beginning to feel better and I wanted solid food. Comfort food!

At 10:30 a.m., feeling very ambitious, I decided I would make meatloaf and mashed potatoes for dinner. By 2:30 p.m. I decided that all I really wanted to do was go back to bed and have someone cook for me, which is when I remembered Chef Loryn’s Cafe.

Chef Loryn’s is tucked into a tiny corner on Main Street. One could easily miss it if not for the sandwich-board sign on the sidewalk. Although the space is tiny, with just a couple of tables and a table or two out front in nice weather, it’s a space to linger and catch up with neighbors, or Chef Loryn herself, who is often seen taking stock behind the counter and running the kitchen.

We have had sandwiches, soups, and salads to-go from Chef Loryn, all delicious. My favorite is the turkey sandwich on a multi-grain roll with stuffing, lettuce, cranberry sauce, and mayo (ask for it with raw onion – it’s fantastic). A runner-up is the flank steak on a pumpernickel onion roll with grilled onions, lettuce, and horseradish cream. Soups are hearty, and some could be called stews. But honestly I haven’t gotten to a third of the things I’d like to try, just because I’m stuck on that turkey sandwich.

Filled with vegetables and chicken.

Every Wednesday Chef Loryn’s sandwich board says it’s chicken pot pie day. Every week I get an email telling me to pre-order my chicken pot pies. Every time I’m in Chef Loryn’s, I see someone picking up chicken pot pies. Well, it was Wednesday, and hoping I wasn’t too late, I placed the call. Chef herself answered and said, “You’re in luck. I have eight left.” Restraining myself from cornering the market, I ordered three.

When I went to pick them up, she said she had made 108 of them, and they were all sold out. In the winter months she will make more and sell all 150 of those, and I can see why they are so popular. They have a classic puff pastry crust, filled with plenty of carrots, peas, celery, and big chunks of chicken. My only regret is that the gravy has a cornstarch-sheen and stickiness to it, but the flavor is what it should be and it hit the comfort-food spot. I also purchased a side-salad, but one pot pie each was more than enough. At $7.00 per pie, it’s a great deal for a fast, warm dinner.

To heat the pies, preheat the oven to 350 degrees F. Bake them in their foil on a sheet pan for 20 minutes. Remove the foil and bake another 10 to 15 minutes, until the pastry is brown and you can see some bubbling on top.

Visit Chef Loryn’s website and sign up for the mailing list. You’ll get a weekly email of dinners available for you to pick-up throughout the week, which include dishes like meatloaf, chicken cordon bleu, and jumbo lump crab cakes, all served with accompanying sides. Breakfast is also available, as is catering.

Update 3/30/10: This morning I received an email from Chef Loryn that the store suffered a fire. Thankfully, no one was hurt. The store will be closed for a while while they make repairs. They will be honoring all catering contracts. I wish Chef Loryn and her staff the best of luck, and will update this page as soon as they reopen.

Update 5/7/10: The following email was sent to Chef Loryn’s email list: “First we want to thank everyone for all your thoughts and prayers. It has been crazy but there has been some good progress. They have gutted the store and we are hoping to start to rebuild this week. We will keep you updated as much as we can.”

Update 6/21/10: Still no news. I did send an email asking for information but have not heard back. Every now and then there’s a truck outside. I hope that means there is progress and she’ll be reopening soon.

Update 10/27/10: Chef Loryn’s is back in business as of today!

Tomato Sauce with Butter and Onion

March 16th, 2010

Just three ingredients for the perfect tomato sauce!

Tomato sauce should be simple, don’t you think? At its root it is merely tomatoes that have been broken down, often using heat, to produce a sauce for pasta, vegetables, or meat, or used as an ingredient such as for simmering meatballs. But the food media has managed to impress upon us, as it often does, that the best tomato sauce should require a fifteen-step, ten-ingredient, five-hour-long recipe.

I am one of the easily impressed upon, and for years have tried to create a great tomato sauce which maintained the integrity of the tomatoes, while presenting complex flavor. Something bright yet rich, substantial yet delicate. I have begun with a sofrito, whole, or diced ingredients, and tried any combination of carrots, onions, garlic, peppers, celery, thyme, basil, sage, oregano, olive oil, ad infinitum, in a vain attempt to come up with a tomato sauce that would make people swoon.

Well, I have finally found the elusive recipe for the perfect tomato sauce. It has three ingredients (four, if you add salt), there is no chopping or sauteing, and takes just 45 minutes to cook. Seriously.

The recipe is attributed to Marcella Hazan’s Essentials of Classic Italian Cooking, a book I owned, regrettably never cooked from, and as I can not find it on my shelves, has probably found its way to the library’s used book bin. I first read about this sauce in late January on Smitten Kitchen, who links to several other bloggers who have tried it over the years, from Amateur Gourmet (2005), to Rachel Eats (2010). It has appeared on the forums of Cook’s Illustrated, and on epicurious.com, twice. In fact, it has been reprinted so many places, I’m embarrassed it escaped my notice.

The fantastic flavor makes it seem like there must be spices or herbs among the ingredients. If you ask someone to guess what is in it, they won’t be able to. While the tomatoes hold their body, the binding is like velvet. It is rich without being overwhelming in the least. From now on, it is our house red.

Tomato Sauce with Butter and Onions
Attributed to Marcella Hazan, Essentials of Classic Italian Cooking, Knopf

– One 28 ounce can whole peeled tomatoes (preferably San Marzano if you have them)
– 5 tablespoons unsalted butter
– 1 medium-sized onion, peeled and halved
– Salt, to taste

1. Place tomatoes, butter, and onion in a saucepan over medium heat, and bring to a simmer.

2. Cook, uncovered, at a slow, steady simmer for 45 minutes, or until droplets of fat separate from the tomatoes. Stir occasionally, crushing the tomatoes with the back of a wooden spoon against the inside of your saucepan.

3. Discard the onion. Salt to taste. Keep warm while you prepare your pasta, and serve.

A few notes regarding the recipe:
– If that much butter alarms you, know that each tablespoon of butter is just slightly more than 100 calories. This recipe makes over 3 cups of sauce, or about 4 to 5 servings, so there’s not much to fear unless you are on a no-fat diet or going to eat this every day.
– Salt. This would make the fourth ingredient, if you use it. Unbelievably, I did not use any at all. I found no need for it. This, coming from a woman who may well beat Lot’s wife in salt content by body weight.
– Some posts mention to add Parmigiano cheese. I tried adding some after a few bites of pasta and plain sauce. I say go naked. The cheese nearly ruined it. Yes, I did just say cheese nearly ruined something.
-taetopia

Butter, onion, tomato. That's it.

Cooked for 45 minutes.

Eat.

Spice & Ice Virtual Cocktail Party: Blackberry-Poblano Margarita

March 10th, 2010

Blackberry-Poblano Margarita

Kara, daaaahling, I’m so sorry I’m late. Yes, yes, I know the party started eons ago, but my dear Felix absolutely insisted I stop by the market to pick up some blackberries for my perfume. The scent drives him wild with passion, and you know I simply can not deny him anything. Oh, thank you, a margarita, what a wonderful idea. I am feeling a bit muddled from my trip.

Your book party is a smashing success, my dear! I haven’t seen so many well-dressed peppers in one place since my cotillion. Had I not been introduced to Felix then, I’d probably be living in sin with that dark, handsome Fiery Almond. Too bad he decided to take up with the Sparkling Ginger Daisy triplets. I understand they liven up a party, but they’re certainly no match for my voluptuousness, hmm? Oh look! There’s Rhubarb Cooler over in the corner. I haven’t seen her since last spring (I hear she might have had some work done), helloooo, dear! Oh, and Red Dawn, how are you, sweetheart! Simply love your dress! I am so glad you didn’t invite that Cosmo girl; she’s been an absolute pill since she had that show on cable.

What’s that? My poblanos? Oh, how kind of you to ask. They are turning into fine, strong little men, although they do have a temper. They take after their mother. I suppose that Latin spiciness runs in my side of the family.

It is just wonderful you decided to feature me in your book, daaahling, and with such a flattering photograph. I look nearly as sweet and luscious as I am in real life! At least I’m told so by several people I’ve given the book to. I think it’s the purple blouse; it sets off my eyes.

I’m sorry, but I must run. Now, now, don’t let me make you pucker like that. I would stay, but Felix has demanded a taste of tequila as soon as possible. Mine, in fact. Ha! Ha! Oh, Kara, how you blush. Tah, tah, daaaahling, and thank you for a wonderful time. I am so looking forward to your next party!

Blackberry-Poblano Margarita

Silver Patron, Cointreau, Fresh Blackberries, Poblano Pepper

by Kara Newman
From Spice & Ice: 60 Tongue-Tingling Cocktails, Chronicle Books, 2009

Yeild: 1 Drink

The luscious purple color of this drink is a stunner! Taste a berry first to check for sweetness. If it’s not supersweet, add a tablespoon of sugar when muddling the berries.

-1 tablespoon fresh blackberries
-1 tablespoon diced poblano peppers, or 1 1/2 tablespoons, if very mild
-1 ounce silver tequila
-3/4 ounce Cointreau

In a cocktail shaker, muddle the blackberries and poblano peppers. Shake with the tequila, Cointreau, and ice. Strain into a martini glass.

Note: If working with fresh blackberries, raspberries, or blueberries, to avoid pulp or seeds in your glass, strain before serving. Blackberries not in season? Use frozen berries.

* * *

The Blackberry-Poblano Margarita has a herbacious quality from the poblanos, and an earthy, almost tropical flair from the blackberries. This is an ideal summer evening party cocktail. It will knock your guests socks off, possibly literally. Between the spice and the tequila, it is not for the faint of heart.

Kara Newman, author of Spice & Ice: 60 Tongue-Tingling Coctails, is the generous host of this virtual cocktail party. Visit her site to see what others have shaken, stirred, muddled and mixed. I highly recommend her book of savory and sweet cocktails with a kick. It makes a unique gift, and is a wonderful addition to anyone’s library.

Napoleon of Crisp Potato, Goat Cheese, Roasted Red Pepper, and Caramelized Onion

March 4th, 2010

Potato, Red Pepper, and Goat Cheese Napoleon

A traditional napoleon is a luxurious dessert. Layers of puff pastry and custard or whipped cream, often interspersed with berries, topped with fondant or powdered sugar. It is meant to be admired before eating. Just looking at one brings to mind images of royal powdered faces with stained lips. The pastry gives some resistance and crackles as the side of one’s fork bares down to make the first cut, just before the pastry layers give way and the custard oozes from its trappings, making an orgasmic mess of the dish.

To the best of my recollection, in the early 90s, somewhere a chef decided to translate the napoleon into a savory dish and added the vegetable napoleon to their menu, sparking a glut of vegetable napoleons nationwide. Then came the napoleons with ragu or duck confit. There wasn’t a menu without a savory napoleon on it. Anything that was layered was now called a napoleon.

I instantly fell in love with vegetable napoleons, their flavors and variety; but after seeing them everywhere for several years, they became a little corny and passe. Though I still spy one here or there, it seems their time in the limelight has passed.

I was thinking of this the other day when I decided to attempt to recreate the layers of a napoleon with what I had on hand. The potatoes became the crisp layer, an herbed goat cheese the custard, and the roasted peppers and caramelized onion the fruit, topped with a layer of melted parmigiano cheese. These are classic flavors, and the assembly created that same orgasmic mess the dessert does. Of my two tasters, one commented that, while delicious, the instability of the layers wasn’t to his taste, while the other declared this was her new favorite dish. Personally I felt the experiment a great success. Served with a green salad with a balsamic vinaigrette, it made for a visually appealing and deliciously satisfying dinner.

Napoleon of Crisp Potato, Goat Cheese, Roasted Red Pepper, and Caramelized Onions

Makes 3 napoleons

– 2 red bell peppers
– 3 oz. soft goat cheese, room temperature
– 2 tablespoons sour cream
– 1 tablespoon finely chopped fresh basil
– 2 tablespoons butter
– 2 tablespoons extra virgin olive oil
– 3 small yellow onions, peeled, halved, and sliced thin
– 1 teaspoon sugar
– 2 large russet potatoes
– 2/3 cup parmigiano-reggiano cheese, grated

1. Preheat a broiler and place the peppers directly under the heating element, turning occasionally until the skin is black and blistered. Remove peppers from the oven and set aside to cool (you may wish to put a narrow cut in the top of the pepper to release the steam). Reduce the oven temperature to 450 degrees. Once the peppers are cool enough to handle, peel them, keeping the flesh in large pieces.

2. While the peppers are broiling, cream together the goat cheese, sour cream, and basil, with a pinch of salt and a few grounds of black pepper to taste. Set aside at room temperature.

3. Melt the butter and one tablespoon of the olive oil in a skillet at medium-high heat. Add the onions and the sugar. Once the onions have wilted a bit, before they are brown, turn the heat down to medium-low. Cook, stirring occasionally, until brown and caramelized, approximately 45 minutes.

4. Slice potatoes no more than 1/4 inch thick. Place in a bowl with a tablespoon of olive oil and a teaspoon of salt, rubbing the oil and salt over the potato slices. Arrange 9 large center-slices on a baking rack on a baking sheet. Bake for 15 minutes at 450 degrees. Once they are fork-tender, increase the oven temperature to 500 degrees. use a spatula to loosen the potatoes from the rack, and bake for another 5 to 10 minutes until lightly browned and slightly puffed. Remove the baking sheet from the oven. (I baked the remaining slices until crispy and ate them as chips. You can also use them to make more napoleons, if desired.) Set the oven temperature to broil.

5. In assembly-line fashion, working carefully (hold the potato slices with tongs if too hot to handle), working on the same rack the potatoes were baked on, spread three of the potato slices with a thick layer of the goat cheese mixture, one layer of pepper slices, and a heaping tablespoon full of the onions. Add another potato slice, and repeat the layering. Top the second layer with a potato slice, and then with a third of the parmigiano. Place the napoleons under the broiler just until the cheese melts and gets lightly brown. Keep an eye on them, they brown very quickly. Serve hot, along with a side salad with a vinegary dressing, or the napoleons may be served as a side dish to an entree.

Crispy Polenta Topped with Creamed Spinach and Over Easy Egg

February 23rd, 2010
Polenta, Creamed Spinach, Egg

Polenta, Creamed Spinach, Egg

It all started innocently enough with an email from a friend. Her husband asked her for creamed spinach, and, overwhelmed by the 147,000 (as Googled) creamed spinach recipes, she asked if I had a recipe. However, there was a twist, “Preferably a truffle oil and no nutmeg or no cheese variety.” It has been for-ev-er since I’ve made a basic creamed spinach. Not since I fell absolutely in love with Ina Garten’s recipe for spinach gratin, which of course has nutmeg and cheese, and which you should make immediately because it is delicious.

In any event, I set out to make creamed spinach that very evening so I could give her an actual recipe rather than instructions for winging it, or giving her something I hadn’t tried. The easiest possible recipe is to saute some spinach in butter until it is nicely wilted, and then add some warm cream, salt, and pepper. But I wanted to give her something richer, creamier, more of the steakhouse variety. I couldn’t leave out the nutmeg. I think it absolutely belongs in creamed spinach, as it brings out the flavors of the sauce, but whatever you do in your kitchen is up to you. You could also drizzle a little truffle oil over it once it’s finished as an added touch.

But then, once I had an entire pot of creamed spinach, what would I do with it? Sure, I could be a glutton and eat it out of the pot standing at the kitchen counter, but I thought there must be some dish I could make with it, rather than just having it as the side to a steak. So I went shopping in my refrigerator. Aha! some polenta I had put in a dish to set after having it soft with sausages earlier in the week, and an egg.

I made the creamed spinach and set it aside to cool. I sauteed a round of polenta until it was extra-crispy on the outside,  topped it with some creamed spinach, and finished it off with an over easy egg. It is a pretty magical, satisfying dish, appropriate for any time of the day. With the addition of truffle oil, this would make a wonderful special-occasion brunch dish.

Crispy Polenta Cake Topped with Creamed Spinach and Over Easy Egg

This recipe makes 4 to 6 servings of creamed spinach, which may be prepared and reheated up to two days ahead. Although the description here is for one serving, obviously you may use as many rounds of polenta and eggs to make however many servings you require. You will have enough creamed spinach for at least six servings of polenta with spinach and egg.

For the creamed spinach:Ingredients for Creamed Spinach
– 1.5 lbs. baby spinach
– 8 oz. whole milk
– 4 oz. heavy cream
– 1/2 medium yellow onion, finely chopped
– 1 large clove garlic, minced
– 1/4 stick (2T) butter
– 2 Tablespoons flour
– 1/4 teaspoon freshly grated nutmeg

1. Bring 1.5 inches of water to boil in a very large pot. Salt the water well, add the spinach. Cover the pot for a moment to begin wilting, remove the lid, and stir the spinach gently until well wilted – approx. 1/3 to 1/4 of the volume you started with.

2. Drain the spinach in a colander, immediately running cold water over it to cool. When drained and cool enough to handle, squeeze the water out of it in handfuls, putting the squeezed spinach in a medium bowl lined with a paper towel as you go. Once thoroughly drained, chop the spinach into large pieces. Don’t worry that the spinach is stuck together, as it will come apart when added to the sauce.

3. Heat the milk and cream in a small saucepan over medium heat (or in the microwave – I heated it for 2.5 minutes at 3% power). Do not boil or simmer, you just want it warm.

4. Meanwhile, melt the butter over medium-low heat in a medium saucepan, and cook the onion and garlic until very soft, approximately 5 minutes.

5. Add the flour to the pot with the onions and garlic, and cook this together, stirring often, for a few minutes on low to cook the roux – you don’t want this to brown (although it will be fine if it does). It will be a pretty solid mass, break it into bits as you stir it.

6. Slowly add the heated milk/cream, whisking like a fiend to make sure there are no lumps. Cook this for 3 to 5 minutes or so. It will be relatively thick, like a thin porridge. If it is too thick, add more milk.

7. Add salt, pepper, and nutmeg. Add the spinach in batches, stirring to blend well. Cook this for another 3 to 5 minutes, stirring often, until warmed throughout.

Set this aside while you prepare the rest of the dish. Alternatively, this can be cooled and refrigerated, and reheated the next day. Of course, the creamed spinach may be served as a side dish to any entree, or eaten out of the pot standing over the kitchen counter.

For the Crispy Polenta Cake, and Assembling the Dish:

If you have not made polenta, it is incredibly easy. Mark Bittman has a great video on making polenta that can be found here. Once you have cooked, soft polenta, spread it in an approximately 1 inch thick layer in a pan and place in the refrigerator to cool until set. Alternatively, use prepared polenta, which you may find sold in the supermarket, packaged in a cylindrical tube.

Use a cookie cutter or rim of a large glass to cut a 3 inch round of set polenta. Alternatively, use a knife to cut any shape you wish, or slice a 1 inch thick slice of prepared polenta. Heat approximately two teaspoons of extra-virgin olive oil in a small, nonstick skillet over medium-high heat. Add the polenta cake and saute until golden and crispy on the outside. (If sauteing several rounds, increase the amount of olive oil, using a larger pan). Set polenta cake on a serving dish and top with creamed spinach. Rinse the saute pan so you can use it to cook your egg.

Prepare the egg(s). (If you would like instruction on preparing an over easy egg, I like this video from SeriousEats.com.) Top the creamed spinach and polenta cake with the egg. Season the dish with a grind or two of freshly ground black pepper. Serve immediately.

Crispy Polenta Cake

Crispy Polenta Cake

Crispy Polenta Cake Topped with Creamed Spinach

Crispy Polenta Cake Topped with Creamed Spinach

The Assembled Dish

Eat

Blue Corn Muffins with Chile and Cheese

February 16th, 2010

In the first week of January, there was a tweet in my Twitter feed from Amy I., writer of the Playing House blog, that read, “Seriously you guys, run, don’t walk to make these chile cheese corn muffins from The Freckled Citizen.” OK, so I walked; but when I finally got there it was worth it.

These are savory muffins, with a crisp, sweet crust. The green chiles lend just a bit of heat and peppery flavor, while the corn kernels add an exciting texture and a cooling component to the spiciness of the chiles. Blue cornmeal has an earthy, less-sweet flavor than its yellow cousin, and gives the muffins a unique southwestern color. They are wonderful served as an accompaniment to chili con carne or black-bean soup, or simply on their own, warmed with a bit of cold butter for breakfast.

The original recipe is from the “Santa Fe School of Cooking Cookbook,” a book I do not own but is now high on my wish list.

Blue Corn Muffins
with Chile and Cheese

by Susan D. Curtis
From The Santa Fe School of Cooking Cookbook, Gibbs Smith, 1998
© Gibbs Smith, 1998

Yields 6 extra-large muffins, 12 large muffins, or 18 small muffins.

– 1/2 cup softened butter
– 1/2 cup sugar
– 5 large eggs
– 1/2 cup buttermilk (milk may be substituted)
– 1 cup all-purpose flour
– 1 cup blue cornmeal
– 2 teaspoons baking power
– 1 teaspoon salt
– 1 cup fresh or frozen corn kernels
– 1 cup grated Monterey Jack cheese
– 3/4 cup roasted, peeled, diced green chile*

1. Preheat oven to 375 degrees. Grease muffin tins well or insert paper liners.
2. In the bowl of an electric mixer, cream together the butter and sugar until smooth.
3. In another bowl, mix together the dry ingredients. Add the dry ingredients to the butter and sugar.
4. In a separate bowl, whisk together the eggs and buttermilk. Slowly mix wet ingredients into the dry ingredients.
5. Stir in the corn, cheese, chiles and mix well. Spoon the batter into muffin tins. Bake about 25 minutes, until just firm.

* Chiles should be prepared prior to assembling the batter. For this recipe, I used two poblano chiles. You could ramp up the heat by adding a roasted jalapeño or two. There are several ways of roasting chiles, but in this instance I pre-heated the broiler with the oven’s rack in the topmost position, then placed the peppers directly under the heating element. I turned the peppers with tongs occasionally, and carefully, until they were blistered and black on all sides, then removed them from the oven. When they were cool enough to handle, I removed the blackened skin, stem, and seeds, and diced the flesh. -taetopia

The Mailman Brings Cheese

February 9th, 2010

Vacherin Mont d'Or, Murray's Cheese Label

It all started with my friend’s enticing post about Vacherin au Four, a soft cow’s milk cheese, studded with garlic, fortified with wine, then melted in its wooden box in a hot oven and poured over potatoes or served fondue-style. There are few things I have a harder time resisting than melted cheese. Plus, it is winter, the height of the melted cheese season, so it seemed a perfect opportunity to try making this simple dish at home.

That meant getting my hands on some Vacherin Mont d’Or. Easier said than done in Northern New Jersey. I telephoned Wine Library in Springfield, who told me that while they did have an order that was supposed to arrive on the next boat, he wouldn’t know if it made the boat until it arrived, and even then he wasn’t sure it would make it through customs. I called Summit Cheese Shop in Summit, and was told that it would be nearly impossible to get, and good luck with that. I phoned Gary’s Wine and Marketplace in Madison, and was told they were out and didn’t expect to get any until next season, which would mean maybe October. I called Murray’s Cheese in Manhattan and was told, yes, they had plenty! I made two dates to hop into the city to pick some up, but both trips were foiled. I was going to have to suck it up and pay for shipping.

A foodie, shopping a website listing a large variety of cheese, armed with a credit card. Well, you can see where this is going, can’t you? My eyes glazed over as my fingers clicked to the “Special Sale” page. I would be saving money if I purchased some cheese on sale, wouldn’t I? And oh, what’s this? A virtual cheesemonger! Answer just a few multiple-choice questions, and my own cheesemonger will guide me to my ideal selections. I went deeper into my trance as “Amanda,” my virtual cheesemonger, described a list of cheeses that I’d surely enjoy. Click, click, click. I should get some bread too! Click. And oh yeah, I almost forgot, the Vacherin Mont d’Or. Click!

Two days later my professionally packaged box of cheese is waiting for me on the porch, with a stamped message on the top of the box informing the FedEx delivery person that it’s OK to leave the package with the recipient, even though it may stink. A lovely (to me) odor envelops our dining room as I inventory the contents of the box: Two Vacherin Mont d’Or (one for me, one for a friend), a half-pound of Cabot’s clothbound cheddar (a friend’s recommendation), a half-pound of Fourme de Ambert (“Amanda” said this blue is mild and sweet), one puck of Brunet (“Amanda” says it’s her favorite goat), a half-pound of Tete de Moine (I need this as have not used my girolle in ages), and one pound of Parmigiano-Reggiano (well, it was on sale), and a loaf of bread (if you’re going to go this far, you may as well buy the bread so you don’t have to go to the store).

Counter-top tasting: The first night, we have a simple tasting. My friend is right, Cabot’s clothbound cheddar is outstanding, and “Amanda’s” picks are spot-on. Not that I wouldn’t have been just as happy with any other cheesemonger’s choices. I have no prejudice against any cheese, but it was nice that these were cheeses that noticeably agreed with my taste. The goat is super creamy and mild, almost the texture of camembert, while the blue is downright luscious with a bit of tang. We eat it standing at the counter, all except the Vacherin and the Tete de Moine. Those, we’ll eat later.

Brunet, Fourme d'Ambert, Cabot Clothbound Cheddar

Vacherin au Four: I meant to make this on day two, but couldn’t get to it until day four. Life got in the way, as it often does, and we didn’t get to it right away. This is too bad because Anne over at Pots and Plumes had emailed me to say that we shouldn’t wait, as hers had been too ripe. I should have listened. When we received ours, it looked very fresh, almost white. By the time I retrieved it from the refrigerator to cook it, it was nearly orange and it had a very strong odor. I cooked it with garlic, wine, and a bit of chive, and ate it with potatoes and bread, but it had taken on a flavor of ammonia and was overripe. I emailed Murray’s Cheese, not to complain but to warn, and was told that I would be credited for the Vacheran Mont d’Or. Way to go Murray’s customer service! We will definitely be ordering from them again.

Vacherin Au Four

Interlude, cheddar with Diana Pittet: Ironic that of all weeks I should be attending a talk by Diana Pittet, who writes of her adventures in cheddar on her blog, CheddarBound. This is a very cozy affair in the private room at Jimmy’s 43 in Manhattan, during which Diana regales a crowd of listeners with stories of her travels and the making of cheddar. We enjoy a tasting of five cheeses, along with a cask ale, an apple cider, and an apple wine. Apple beverages go fabulously with cheese!

Spicy tomato and blue cheese soup
: It has occurred to me that perhaps I have purchased too much cheese. I should include some in a recipe, perhaps. I find the recipe for Michael Symon and Michael Ruhlman’s spicy tomato and blue cheese soup on leitesculinaria.com. Made with sriracha and blue cheese, it is creamy, fruity, and spicy. I highly recommend it. But I’m not sure I could have it more than a few times a year. It is rich.

Spicy Tomato and Blue Cheese Soup

Spicy Tomato and Blue Cheese Soup

Another tasting: End of the week, another spread of cheese on the counter for my husband and me to pick at. I’ve discovered this is probably my favorite way to eat cheese. It goes against all tenets of healthy eating, but I like it. Take what you want, when you want it. Leave the bread out with a knife nearby, or crackers, and maybe some olives, fruit, or nuts. Cheese is Nature’s processed food, so I figure it can’t be all that bad for us.

Tonight or tomorrow the Parmigiano-Reggiano will take its turn, grated over pasta. Sometime this weekend I’ll be leaving the girolle out on the kitchen counter to enjoy the thin rosette-shaped slivers of Tete de Moine with a glass of white wine. Probably while perusing Stinky Bklyn’s website. Their cheese-of-the-month club looks very tempting….

Nespresso’s Le Cube

January 29th, 2010
Nespresso Cube (and Aeroccino, sold separately)

Nespresso's Le Cube (and Aeroccino, sold separately)

I can not make good coffee. I have read at least 50 articles on technique, studied several TV programs, spoken to a number of professionals, tried varying temperatures and filtration of water, bought the best coffee beans, and purchased a truly embarrassing number of coffee grinders and machines, manual and automatic, in a quest to create a drinkable cup of coffee. I have French-pressed, dripped, percolated, and brewed, until I cried tears of spent coffee grounds. After all this, if someone held a gun to my head and screamed, “Make me a GOOD cup of coffee NOW or you’re DEAD!” I’d simply apologize and go quietly to my grave.

As the years (years!) wore on, I discovered what coffee I did and did not like: I liked very strong, but not bitter, coffee. I did not like Starbucks’ coffee, and I loathed Dunkin’ Donuts’. I found most New York City diner-coffee acceptable, but that’s probably because I knew exactly what I was going to get. I liked coffee that had at least some mouthfeel and texture, while I disliked coffee that was watery. And finally, there wasn’t a single place in Madison, New Jersey, or its surrounding area that made good coffee, period. At least it was nice to know it wasn’t just me.  (This last has changed. Nautilus Diner in Madison has OK coffee, and Rob’s Bistro makes a very fine cup of Joe.)

I found I liked espresso. Great espresso has a nutty and dried fruit aroma, a dark body that you can’t see the inside of the cup through, a mousse-like, caramel-colored crema on top, and a rich, strong, coffee flavor. But I’d say 98% of the espresso I’ve been served in restaurants is dark-brown water with a bit of tan-colored foam around the rim, and it tastes as terrible as it looks. The best espresso I’ve had in New York was at Becco in the theater district. Even the server raved about it and crooned that the staff was allowed to have their fill of the stuff for free (oh, the envy).  Starbucks’ espresso, while not great, was passable and my go-to beverage for a long time. Of course, the best espresso I ever had was in Italy, and that wasn’t just one cup. I mean, wherever I went in Italy, I was served excellent espresso. Ah, la dolce vita indeed!

My coffee woes would not normally be a problem. The only one in my house who drinks coffee is me, so nobody need know of my infirmity. But then my ever-observant husband detected two clues of my distress: The first was my wrinkled-nose and screwed-up face along with exclamations of “ick! ick! ick!” during my regular brewing attempts. The second was the growing pile of rejected coffee makers I had retired to the basement, which was reaching an alarming proportion. The coffee grinders were simpler to hide; I would simply call them spice grinders instead.

I honestly don’t remember how we found out about Nespresso’s Le Cube. I think it was when we were in a Sur La Table, but no matter. Christmas of 2006, my husband surprised me with a Cube, and my life changed forever. Look at how perfectly lovely it is (shown in Titanium Grey – it comes in four finishes):

Nespresso Le Cube

Nespresso Le Cube

It really could not be any easier to use. Simply insert a capsule in the top, close it, press a button, and voila! Nearly perfect espresso with a nice crema. There’s even a heating element to warm the cups where they are stored atop the unit (frivolous, yes, but a nice perk). It’s extremely easy to clean, only requiring a descaling rinse once every three months. No machine that costs two month’s rent, no grinding beans, no temperature controls, no lessons in tamping and how to “pull” a cup of espresso. Just a button push. Is it Italy-quality? No, but it is close, with the significant upside that I can make a shot or two in the morning on the way to work without a big production.

There are several varieties of coffee to choose from. My favorite is the Arpeggio. They also have lungo capsules, good for a larger cup, though I find none of them are strong enough for my double cappuccinos, so I sometimes use two singles of the regular capsules. Although the machine is not inexpensive (around $200), the capsules are only $.55. It has certainly paid for itself over the years and is absolutely worth the investment.

The only downside is that Nespresso sells flavored variations toward the end of the year that are limited editions. I was simply over the moon about the chocolate-orange flavor from 2007, but they no longer sell it. Granted this is bastardized espresso, but it was really good as an occasional treat. I was tempted to pay $100 to someone in Europe who was selling 20 capsules on Ebay, but I restrained myself.

I am a cappuccino drinker in the morning, so I purchased Nespresso’s Aeroccino, which froths and warms milk. It works like a charm.

Le Cube really is one of the best gifts I ever received. If you are coffee challenged as I am, or you just like good espresso, I can’t recommend it highly enough.

Long-Cooked Sugo and Turkey Meatballs with Porcini, Pine Nuts and Raisins

January 24th, 2010
Pasta, Sugo, and Turkey Meatballs

Pasta, Sugo, and Turkey Meatballs

“Oh, Lidia, this is never going to fit!” That’s me, brow furrowed, wooden spoon in hand, peering into my 3 qt. saute pan, talking to Lidia Bastianich as channeled through her book, Lidia’s Family Table. I believe I said that three times over the course of making this recipe. For some reason, it just doesn’t look like you can possibly fit any more ingredients in the pan, but by magic, and by the diligence of a good recipe tester, it all works out.

Chef Bastianich’s cookbook, true to its name, is full of recipes that will feed six or more. There are several recipes, such as this sugo, that describe one base recipe and then several variations or uses for it. For instance, she mentions this sugo is good “as a topping for a big bowl of dressed pasta,” “as a meat course with vegetables,” “in a risotto, using the sauce and broken-up meatballs,” etc. Among the expected recipes for pasta, polenta, and soup, there are some lovely vegetable recipes, such as roasted eggplant and tomato salad, and grilled corn and figs with balsamic reduction, and hearty dishes such as rabbit cacciatore.

With cinnamon, pine nuts, and raisins, the aroma and flavor of this sugo and meatballs are reminiscent of Middle Eastern cuisine. Although these ingredients typically fall into the sweet spectrum, their sweetness is tempered  by the vegetables of the soffrito and the acid of the tomatoes. I found the flavors of this dish refreshingly unexpected and interesting. The sauce is thick but not cloying, and coats the pasta (should you decide to serve it with pasta) beautifully. But the most incredible thing about this dish is the texture of the meatballs themselves. While sturdy and toothsome on the outside, they are incredibly soft and moist inside. Be forewarned, this is *not* your usual tomato-y sauce with beef or beef/pork/veal meatballs. If you are looking for the typical tomato-sauce and meatballs recipe, this is not it.

This recipe fit the bill as a winter-housewarming recipe (important criteria when it’s less than 40° F. outside), a meal to have together as a family, and the very important opportunity for leftovers. This makes enough for three meals for my family of three. It would have made four, except we ate a half dozen of the meatballs standing over the pot while we were tasting…for research, of course.

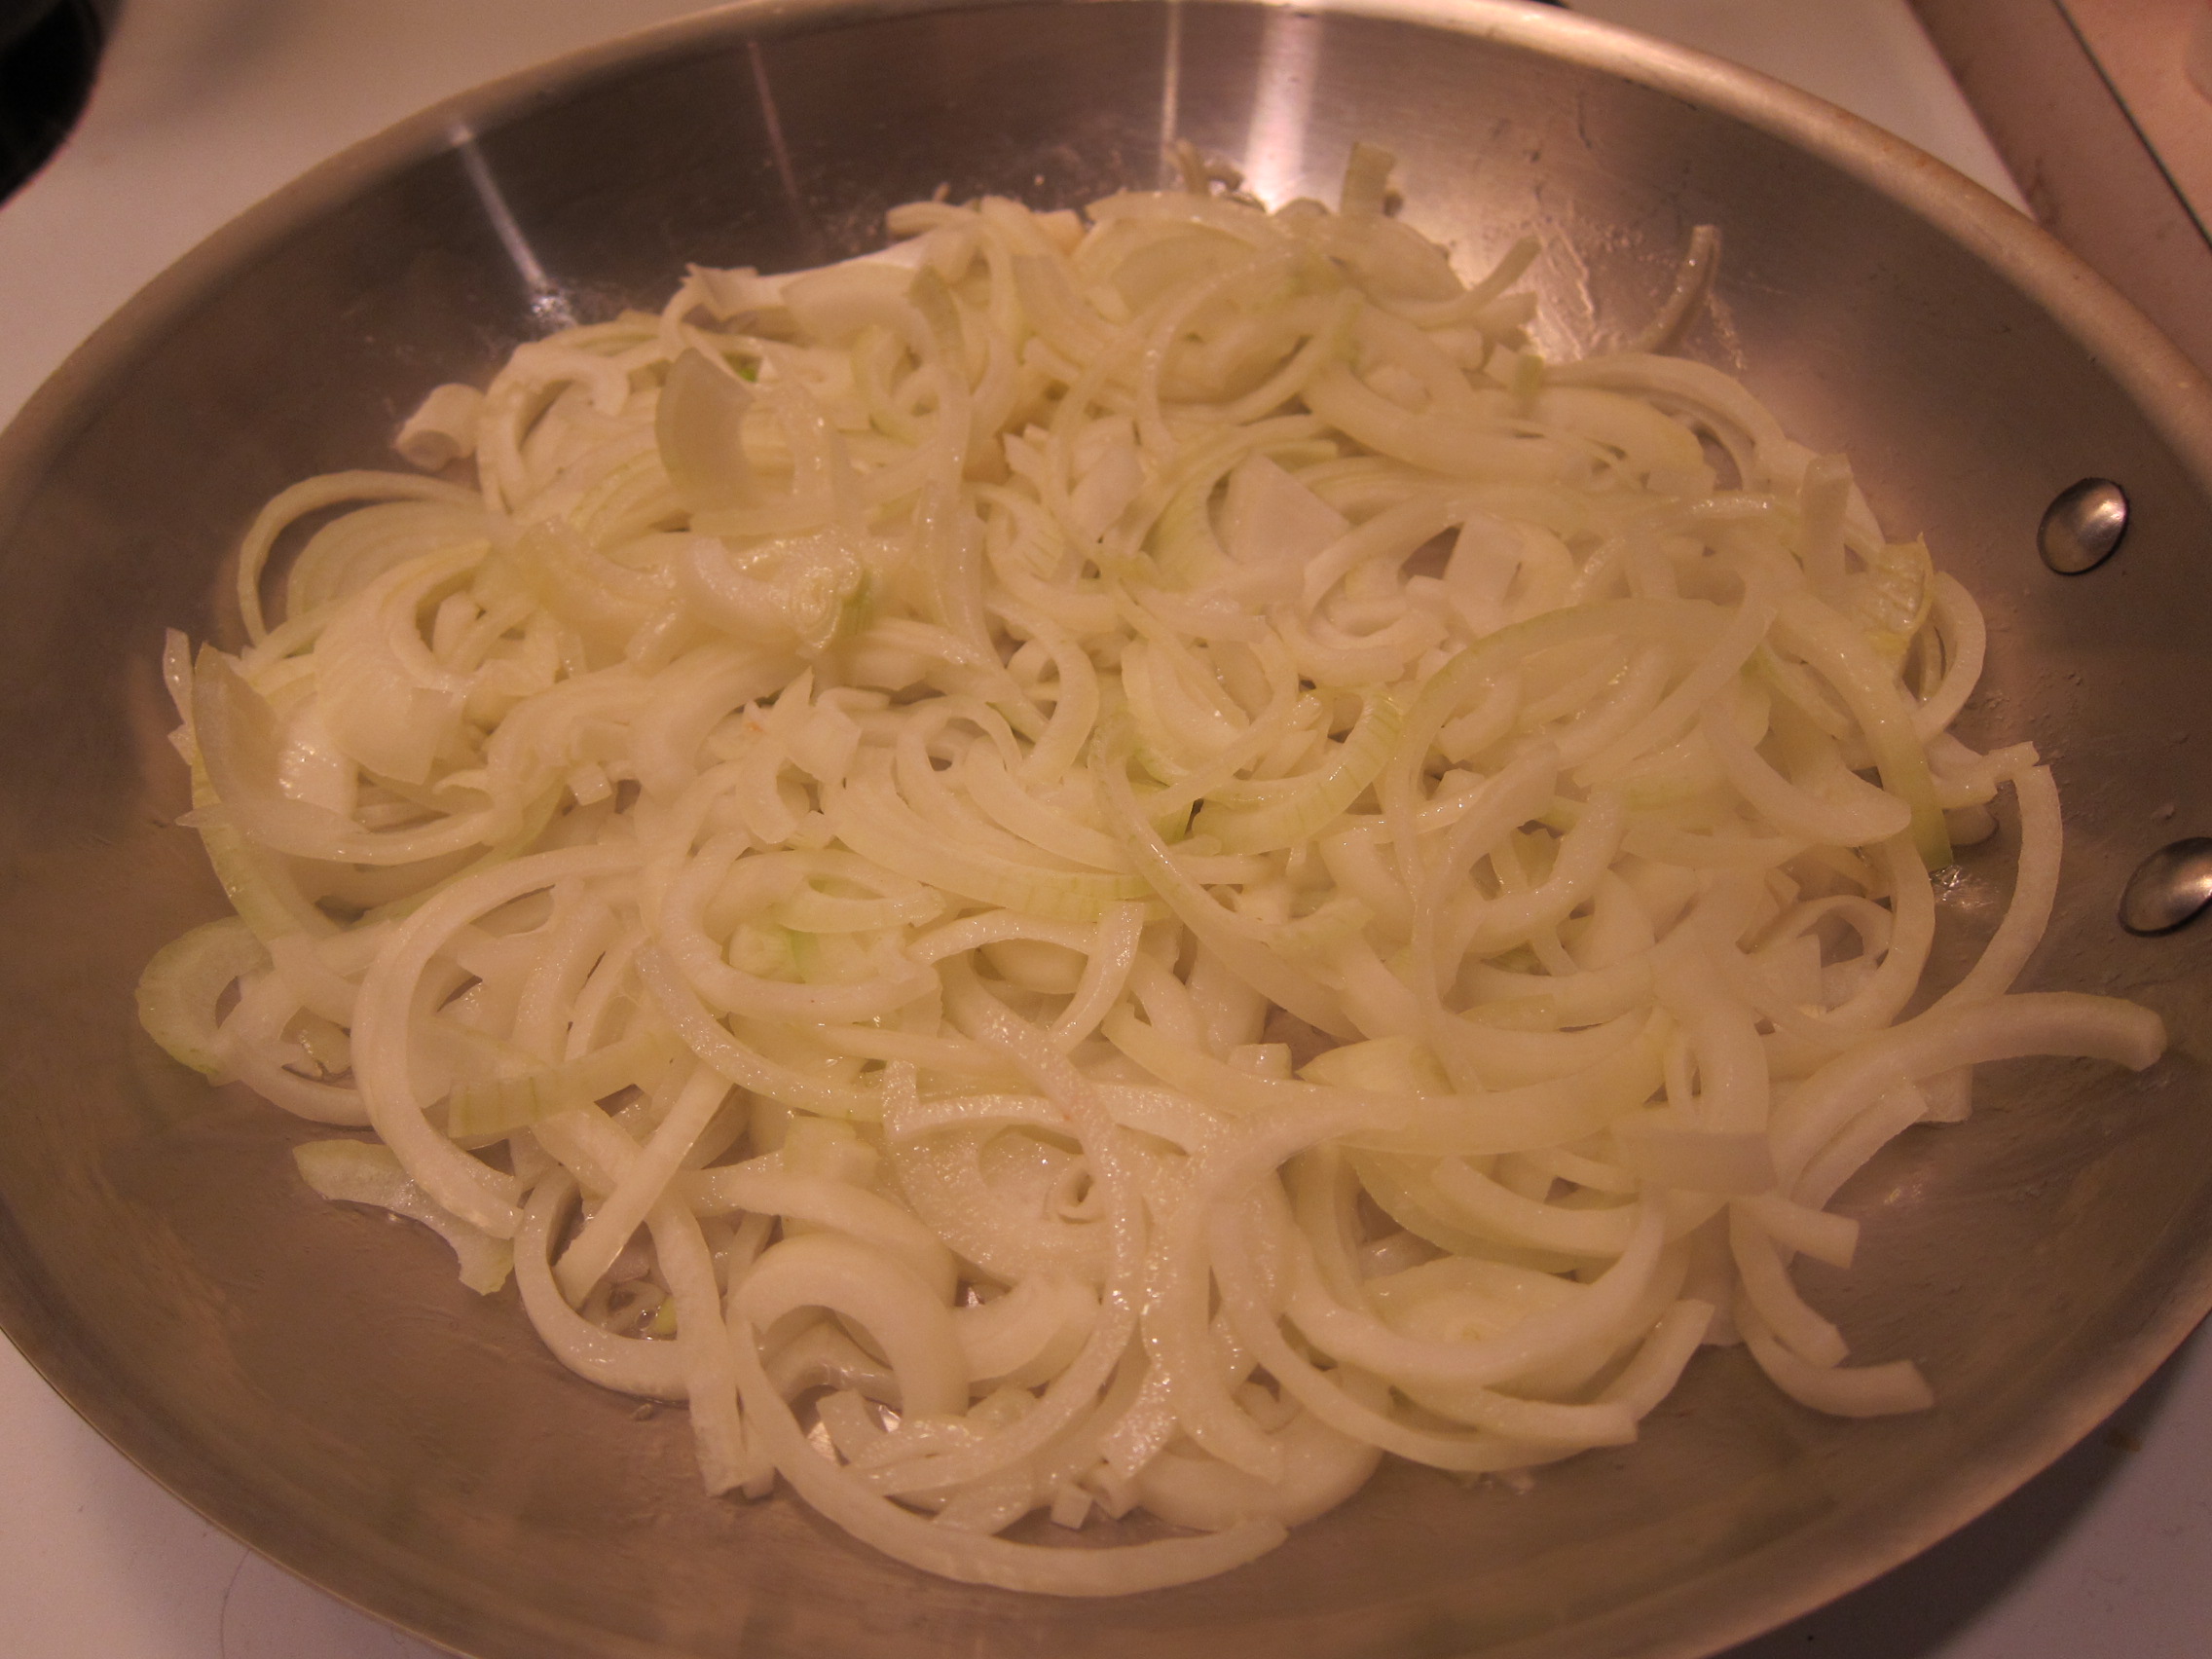
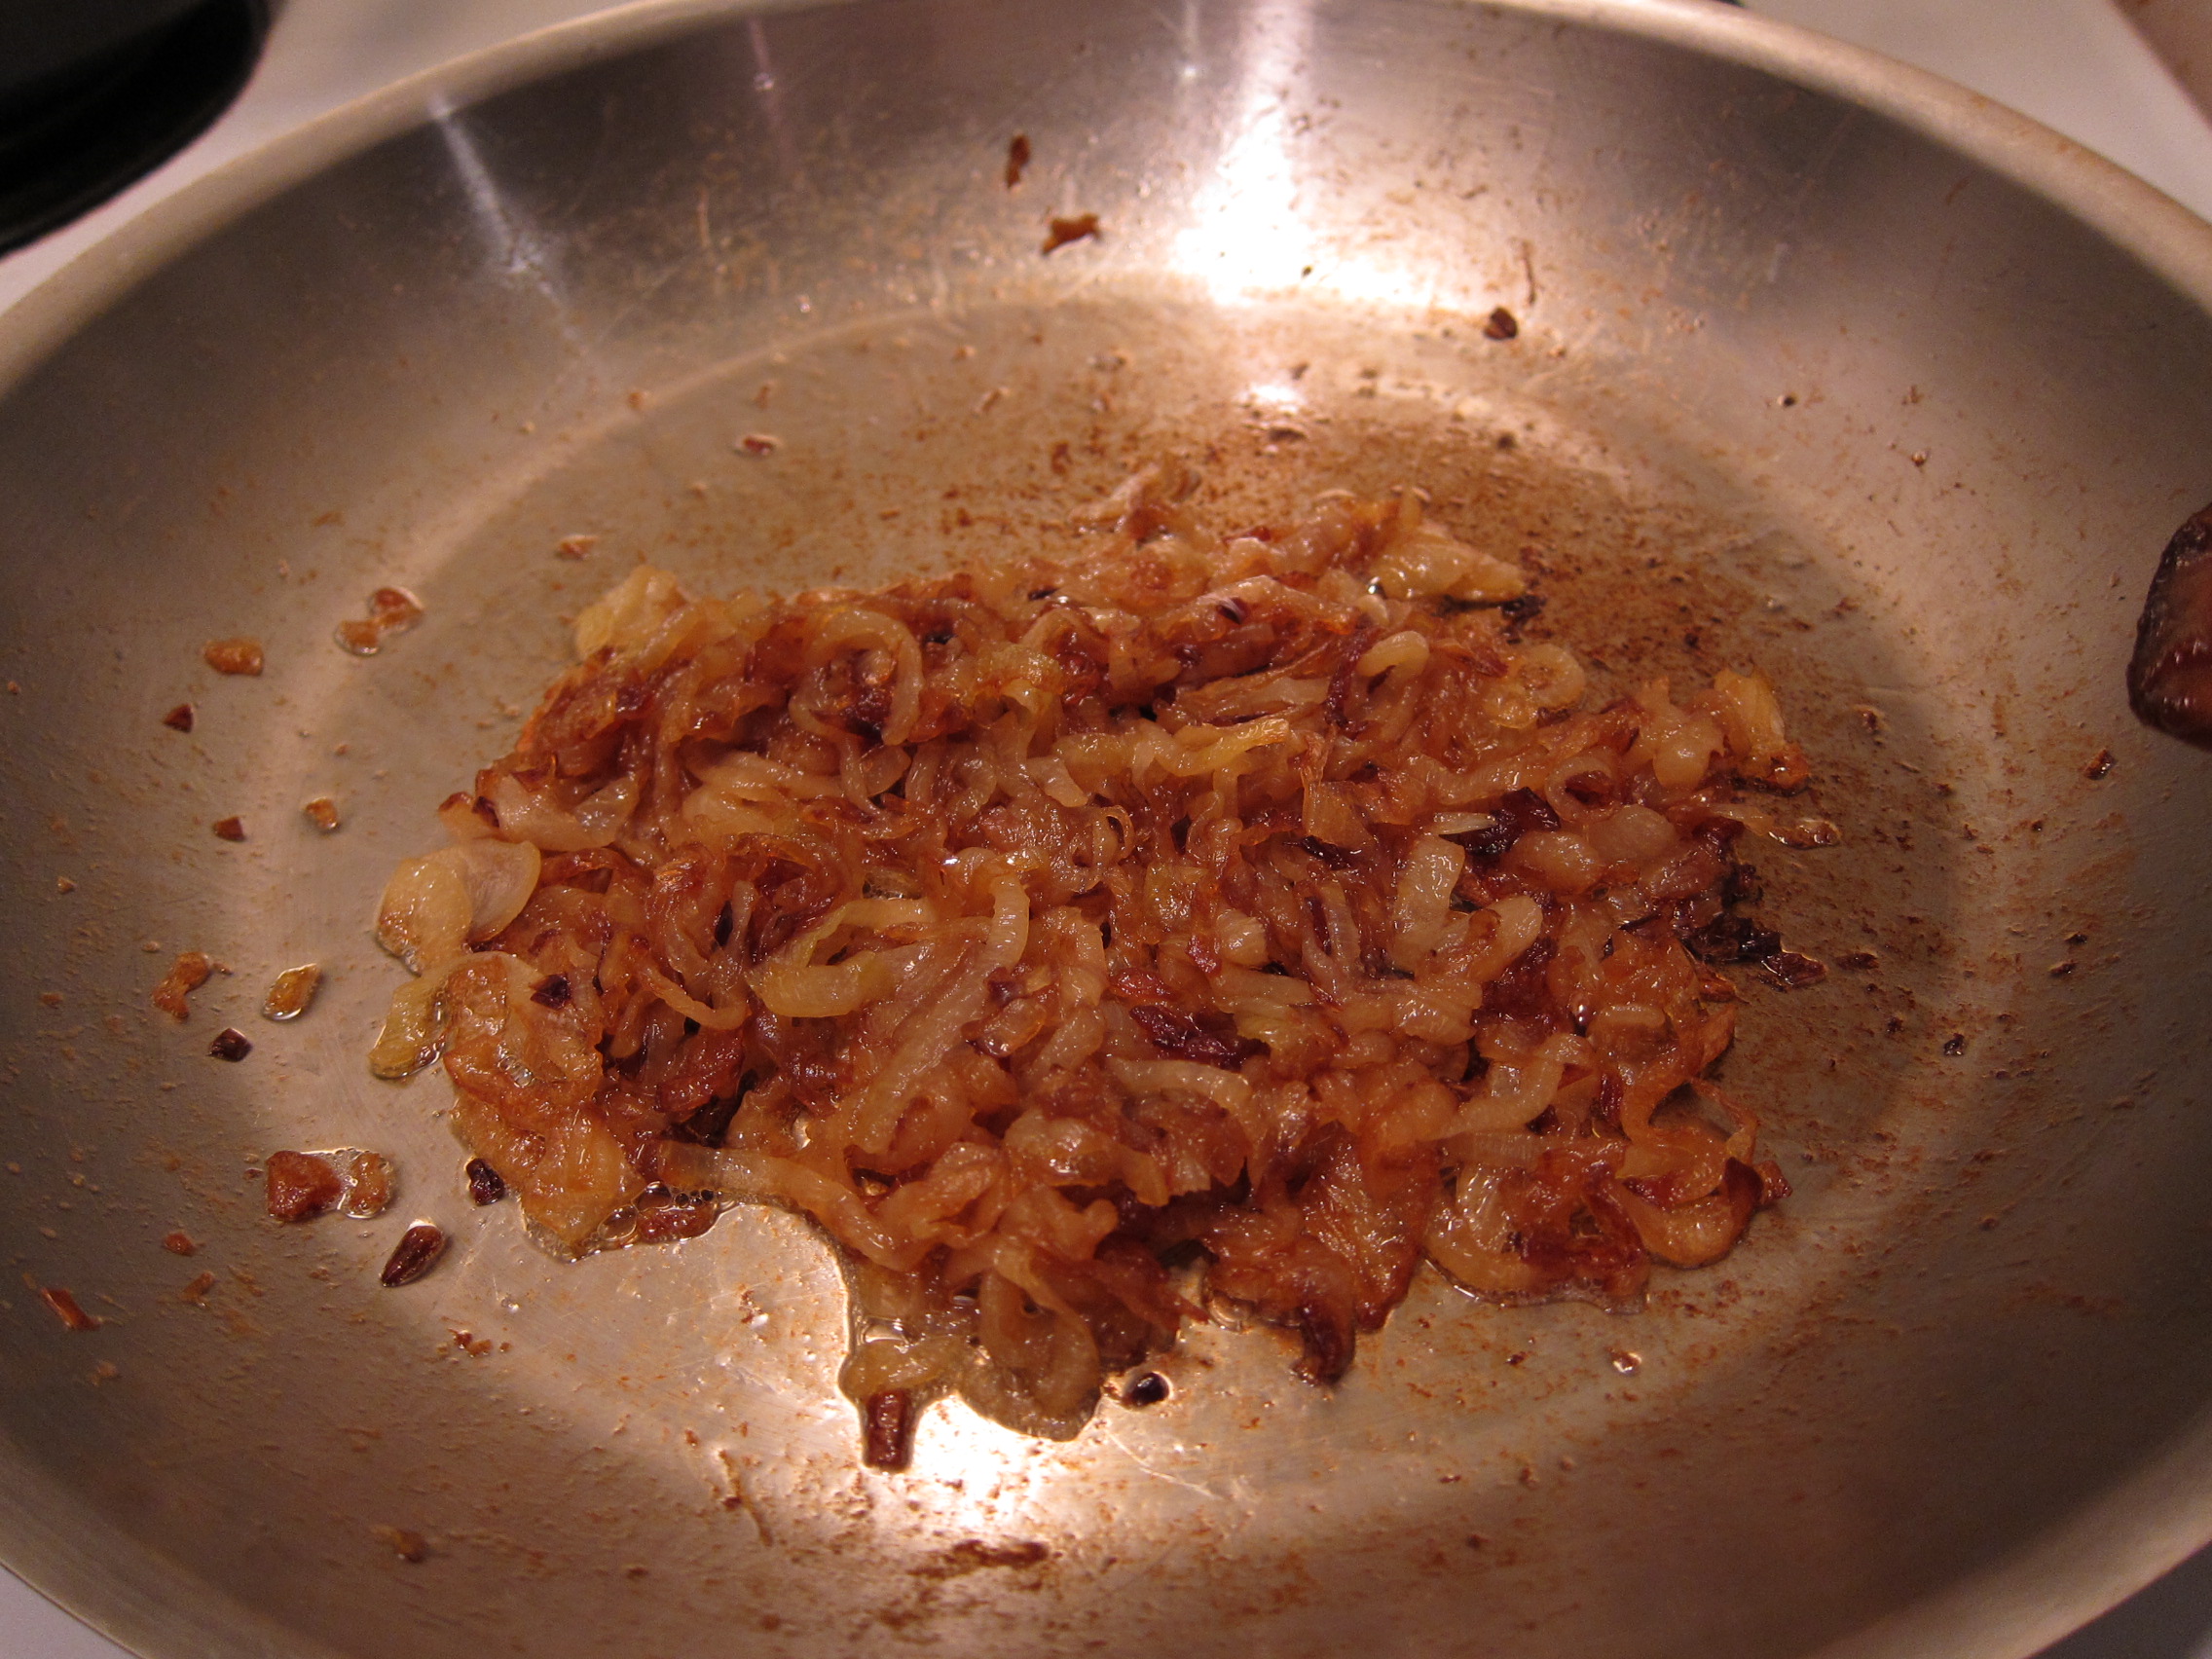
The recipe begins by making a soffritto. This is a vegetable base for the sauce, made by finely mincing various vegetables and softening them in the pan, before putting the tomatoes and broth in. Although the recipe says to cook the vegetables approximately four minutes, I cooked them longer. Make sure your vegetables are very soft, or else they will simply be hard pits in your sauce, rather than disintegrating into the tomatoes. In addition, when toasting the tomato paste, make sure it gets nicely browned. The whole concoction of vegetables and tomato paste when mixed together should be slightly darker orange-brown than the color of a basketball.

You’ll want very good ventilation for frying the meatballs, else your house may take on the odor of an Italian street fair for a while. However, Chef Bastianich makes note in her book that the meatballs don’t have to be fried (although I feel you will very definitely miss the texture). If you decide not to fry them, she says to increase the sauce by at least a third (or decrease the meatballs by a third) so that they have plenty of sauce to cook in.

Do not be put-off by the length of this recipe. While there are several steps and many ingredients, the directions are all relatively simple. If you love to cook, you’ll have a lot of fun making this dish. And remember, when you’re looking into the pan feeling certain that another quart of stock or three-dozen meatballs will not ever fit into your 3 qt. pot, believe me, it will.

Note: In the cookbook Lidia’s Family Table, Chef Bastianich includes a variation of this sugo with sausage meatballs. I have omitted directions for that recipe from this text.

Lidia's Family Table

Long-Cooked Sugo and Meatballs
by Lidia Matticchio Bastianich
from Lidia’s Family Table
© Knopf, 2004

About 2 quarts of sugo, to cook and serve with 3 dozen meatballs.

Frying the Soffritto and Starting the Sugo

For the soffritto
– 6 tablespoons extra-virgin olive oil
– 2 medium onions (3/4 pound), minced in a food processor
– 3 or 4 plump shallots, minced in a food processor
– 2 or 3 fat garlic cloves, minced in a food processor
– 1 large carrot, minced in a food processor
– 2 large stalks celery, minced in a food processor
– 5 or 6 fresh bay leaves
– 1/4 cup tomato paste

For the sugo
– One 35-ounce can San Marzano plum tomatoes and juices, passed through a food mill (4 cups)
– 8 to 12 cups or more hot Turkey Broth, Simple Vegetable Broth, or plain hot water (recipes for the broths are in the book, I used my own vegetable stock)
– 1/2 teaspoon salt, plus more if needed
– 1 cinnamon stick

Pour the olive oil into the pan, drop in the onions and shallots, and set over medium-high heat. Stir for a minute or two, until the onions begin to sizzle.

Drop the garlic into a hot spot and spread it out to caramelize for a minute, then stir with the onions. Stir in the carrot and celery, and get them cooking; drop in the bay leaves and cook the soffritto for another 4 minutes until it is starting to dry out. Lower the heat if necessary to prevent burning.

Push the vegetables to the side and drop the tomato paste into a hot spot. Toast it for a minute or more, then blend it into the soffritto. Pour in the milled tomatoes and juices, and stir; slosh the tomato container with a cup of hot broth or water and stir that in too. Bring the sauce to a boil quickly, and cook over medium-high heat for 5 minutes or more, stirring frequently, until it has just begun to thicken.

Pour in 4 cups of the hot broth, stir it in, and note now the level of the liquid in the pan: this is about the level that the sugo should be at the very end of cooking, after the meatballs have been removed. Stir in another quart of the broth, and bring to a lively boil.

Submerge the cinnamon stick in the sauce. Cover the pot and adjust the heat to maintain a steady but gentle bubbling all over the surface of the sugo . Let it cook for at least an hour or longer, checking the pot every 20 minutes or so. It should be redicuing steadily. If it’s barely dropping, or not at all, raise the heat and set the cover ajar ot speed its concentration. If it’s dropping extremely fast, lower the heat to slow the evaporation. Add hot broth or water if needed to keep the sauce at the level you want.

Make the turkey meatballs while the sugo cooks. Once they are finished, complete the recipe as follows:

Have the sugo at a gentle simmer over low heat when the meatballs are fried and ready to go into the saucepan. Have hot broth or water on hand if needed. Drop the meatballs in one at a time; fit as many as you can in the bottom of the pan in one layer, but leave enough space to roll them around. Drop the rest of the meatballs in to make a second layer. Add hot broth or water if necessary so the meatballs are covered with liquid. Stir gently to mix the broth with the sugo – don’t break the meatballs! Cover the pan and raise the heat slightly to bring the sugo back to a simmer. Set the cover ajar and adjust heat to maintain steady simmering (but no threat of burning the meat on the bottom), and cook the meatballs for 35 to 40 minutes.

Turn off the heat and let the meatballs cool in the sugo and absorb more of its flavor (unless you need them right away). When cool, remove them to a big bowl. If the sauce is thin (probably well above the 2-quart mark), return it to a boil gradually and cook it uncovered to thicken. Stir frequently as it thickens; reduce it to the 2-quart level, or to whatever consistency you like – that’s the most important guideline. Taste the sauce during this final cooking, and add salt, if needed, or adjust the other seasonings.

Serve sauce and meatballs right away if you want. Otherwise, pack the meatballs in containers with enough sugo to cover and the rest of the sauce in separate containers. Portion them, for convenience, in the amounts you’ll use in different dishes. Store in the refrigerator for 4 days, or for several months in the freezer.

Making Turkey Meatballs with Pine Nuts and Golden Raisins

– 1 1/2 tablespoons extra-virgin olive oil
– 1 medium onion, finely chopped (about 3/4 cup)
– 1/2 teaspoon salt, plus more as needed
– 4 slices dried white bread from a sandwich or big Italian loaf
– 1 to 2 cups milk
– 3 pounds ground turkey meat
– 3 large eggs, well beaten with a pinch of salt
– 2 tablespoons chopped fresh Italian parsley
– 1 1/2 tablespoons porcini powder (to make porcini powder, place dried porcini in a spice or coffee grinder, and pulverize them as fine as possible – for more notes on porcini, see Lidia’s Family Table)
– 1/2 teaspoon freshly ground black pepper, or to taste
– 3/4 cup golden raisins, plumped in warm water and drained
– 3/4 cup pine nuts, toasted in a dry skillet

Pour the olive oil into a medium skillet, drop in the minced onions, sprinkle with a pinch of salt, and set over medium-high heat, stirring until they begin to sizzle. Lower the heat and cook for 4 to 5 minutes, stirring occasionally, until the onion is wilted and slightly dry (but not colored). Scrape out of the pan and let cool.

Break up the dry bread slices into pieces roughly an inch or two across – you should have almost 4 cups – and put them in a shallow bowl or baking dish. Pour enough milk over to cover them, and soak for 4 to 5 minutes. When the pieces are completely soft, gather them in your hands and firmly squeeze out all the milk; you should have almost 1 cup of densely packed moist bread.

Loosen  up the turkey meat if it’s been compressed in packaging; spread it out in a large mixing bowl. Pour the beaten eggs on top, sprinkle on the parsley, porcini powder, salt, and freshly ground pepper. Scatter the drained raisins and pine nuts on the meat, then spread the cooled wilted onions on top. Break up the clump of wet bread, spreading little bits over the meat. Now fold, toss, and squeeze the meat and seasonings together with your hands and fingers to distribute all the ingredients evenly.

Spread the flour about 1/4 inch deep in the center of a baking sheet.

Pour vegetable oil into a large, heavy skillet or saute pan – 12 inches in diameter if possible – to a depth of at least 1/3 inch.

Scoop up a portion of meat with a small ice-cream scoop, a large spoon, or your fingers. Lightly shape the meat between your palms into 2-inch balls, a bit larger than golf balls (or whatever size you like). Drop each ball onto the floured sheet, roll it around until coated, then place it on another baking sheet. Form and flour all the meat balls in this manner.

Set the skillet over heigh heat until the oil is very hot. With tongs or a spatula, carefully transfer meatballs to the pan, as many as you can, leaving at least an inch or so between them. Cook for a minute or two, until they’ve starged to brown on the bottom, then turn them continuously – watch out for oil spatters – until golden-crusted on all sides, about 6 minutes. As they are done, transfer the fried meatballs to a baking sheet (I set them on a cooking rack atop a baking sheet to keep them dry – T). When all the meatballs are on the tray, sprinkle salt lightly over them (just a couple of pinches in all).

Note: The meatballs will finish cooking in the sauce; they are fried just until a golden crust forms. So, if you intend to eat them as is instead, be sure to fry them longer, until they are cooked through.

Before frying the next batch, turn off the heat and, with a fine-meshed skimmer or strainder, remove any browned bits from the oil. Add oil if needed to restore the 1/3 inch depth and heat it up again. (I must admit, I completely skipped this step. I found there was plenty of oil to fry 3 dozen meatballs in about four or five batches)

When all the meatballs are fried, cook them with the sugo following the instructions above.

Sugo and Turkey Meatballs with Pine Nuts and Raisins

Weeknight Roast Chicken

January 19th, 2010
Roast Chicken and Green Beans

Juicy Roast Chicken and Green Beans

I know I said I’d cook more using recipes from my vast collection of cookbooks, but it was just one of those days. At work, tired, wanting something healthy and delicious to eat for dinner, but not wanting to cook. I knew I needed something to blog about, but whatever; the blog post could wait. I was thinking perhaps I’d pick up a rotisserie chicken from the local rotisserie chicken place or from Whole Foods and be done with it. No pans to clean, no carving, no hassle. That’s when I ran across a blog post by Michael Ruhlman, “America: Too Stupid To Cook,” and hung my head in shame.

The point of Mr. Ruhlman’s article is a bit different than this post, which is meant to give weeknight cooking a bit of perspective, but worth noting. Briefly, Mr. Ruhlman’s point is that Americans are made by the media to feel as if they aren’t talented enough to put a meal on the table unless it comes from a microwaveable box, or if they are specifically told a recipe is easy. I can’t agree with him more. Even shortcuts from shows like The Food Network’s 30 Minute Meals may overwhelm many. We never seem to have all the ingredients, and frankly it seems like so much work. To some, watching Rachael Ray, the show’s host, make one meal in her perfectly-organized kitchen with plenty of counter space is akin to watching a short-order cook assemble 20 breakfasts simultaneously. It’s daunting, and makes people uncomfortable in their own kitchens. (Note that I disagree with Ruhlman’s putdown of 30 Minute Meals. Watching Ms. Ray cook, or for that matter exist on this planet, may be akin to enduring nails on a blackboard (my thoughts, not his), but for the most part the show provides relatively-healthy, well-rounded recipes, that do involve “real cooking.” More power to her producers if the show actually does motivate some people to get past their fears and into their kitchens to cook.) Mr. Ruhlman goes on to state, “…the notion that cooking is hard and that it takes a long time and we’re just too stupid to cook is wrong.”

Which brings me to my point. Left to their own devices with only an oven and a piece of meat, I’m pretty sure anyone can figure out that they need to turn the oven on and put the meat inside the oven to cook it. But because people are hammered by TV, websites, magazines, and cookbooks with a million techniques, they become frightened and don’t cook at all. A million questions are then asked: What temperature do I cook the meat? It doesn’t matter much – either a low temperature for a long time or a higher temperature for a shorter time. Do I need to marinate? Nice, but not necessary. What about seasonings? Salt and pepper do just fine. When is it done? When it is cooked. Really, stop worrying! Block out the noise in your head. Do what feels right. Our grandparents did not have the luxury of meat thermometers, or ovens that told (or even held) an actual temperature, or a bookstore filled with hundreds of cookbooks, or exotic ingredients just a click away. They simply put real food on the table. That’s what we should aspire to.

To continue with the story of the chicken, my personal shame after reading Mr. Ruhlman’s article came not from a feeling that I couldn’t cook. My shame came from knowing that I can cook a perfectly delicious, healthy meal, without much trouble, and that I was choosing not to because I was tiiirrreeed. I’ve been choosing to do this for most of my adult life, and I should have learned by now that this is a terrible waste on so many levels. Don’t get me wrong, if you’re going to go the fast-food route, a rotisserie chicken is possibly one of the best options. But for me, someone with easy access to good ingredients, who knows how ridiculously simple it can be to roast a chicken, it seemed silly. I was about to spend too much money for too little food, with questionable nutritional value, for poultry that was probably raised in a factory. I decided I would get over myself and roast a chicken.

But, wait. Why just one chicken? Roasting one chicken is just as easy as roasting two, and if I roasted two I could make chicken salad the next day. And then if I had two roasted chicken carcasses, I could make quite a bit of chicken stock, which could go into soups and sauces. All of this would come from maybe 45 minutes of hands-on work all told. Here’s how it went:

Roast Chicken:

  • On my way home from work, I purchased two small chickens, about 2.75 lbs. each. (I find smaller chickens remain far more moist than their bigger siblings, and they feed my family of three perfectly.)
  • As soon as I arrived home, before I even changed my clothes, I turned the oven to 475 degrees F.
  • While the oven was heating, I cut two peeled medium onions, a couple of unpeeled carrots, and two stalks of celery into large chunks, threw them into a roasting pan, drizzled some olive oil, salt, and pepper on them, and tossed the vegetables with my hands. This would serve as the rack for the chicken, and provide some additional flavor. If I had potatoes, those would have gone in too, and I would have served roast potatoes with my chicken. But I had no potatoes, oh well. Next time! (Have no vegetables? No worries, leave them out.)
  • I patted the chicken dry with paper towels. I cut two lemons in half and shoved one half of a lemon into each of the chickens. The other halves I squeezed over the chicken and vegetables and tossed into the pan. (I love lemon with poultry, and I nearly always have lemons in the house. If you don’t have lemons, don’t worry about it – skip ’em!)
  • I shoved a half handful of rosemary and thyme in the cavity with the lemons. (I have rosemary and thyme plants in my home. You could also use a couple of tablespoons of dried herbs. Any combination of herbs is good here – oregano, sage, etc. Or you could skip the herbs altogether should you not have any at hand or are feeling particularly lazy.)
  • I drizzled olive oil on the chickens, then some salt and pepper, gave them a good rub down, and tied their little legs together. (I only truss a chicken to keep the leg meat from shrinking off the bones, and it keeps the birds shape nicer. If you have no twine, or have little inclination, it is not necessary.)
  • I put the roasting pan with the vegetables and the chickens into the oven and immediately turned the temperature down to 400 F.
  • For the next hour and ten minutes, I changed into more comfortable clothes and fiddled about on my computer a while. I figured I should check the birds for doneness just about an hour after I had put them in the oven. No need – I actually smelled a distinct difference in the aroma of the house. I ran downstairs, tested the thigh meat with a meat thermometer and pulled the birds out to let them rest. (No thermometer? Pull the leg away from the body just a bit and see if the juices run clear. No pink juice means they’re done!)
  • While the chickens were lying about, I put a bag of frozen green beans in the microwave to steam per the directions, dumped them in a bowl with a bit of butter and salt.
  • I then carved the chicken, and we ate. (“Carved” sounds more elegant than it was, which was more like tearing it apart with my hands. Chickens this small stay pliant and nearly fall into pieces.)
Roast Chickens Ready for Roasting

Roast Chickens Ready for Roasting

Roasted Chickens

Roasted Chickens

Ultimately, the only thing you *need* here is an oven, a chicken, a roasting pan, and some salt and pepper. I know some people would not use salt at all, but that’s completely against my culinary principles.

If you want to make things complicated, possibly the best roast chicken I’ve ever made was the one from the Zuni Cafe Cookbook. You can see an adapted recipe here. This will require salting the chicken a day ahead, preheating a pan, searing the breast, etc. It is not difficult, and it’s definitely worth cooking, but it’s not necessarily something I’d want to tackle during the week.

The next evening I made chicken salad from the second chicken. This cranberry walnut version is a delicious recipe that takes only a few minutes to make. Chicken salad is super easy – it’s just diced chicken tossed with a perked-up mayonnaise dressing.

Two days later I made chicken stock. I pulled the skin/fat off the backs of the carcasses, cut some carrot, celery, and shallot (I didn’t have onions) into pieces, bundled some thyme and a bay leaf, put it all in a pot and covered it all with cold water. I left it on a high simmer for three hours. Because we did such a good job eating the chicken, there was very little protein or fat to skim off. I would up with four quarts of beautiful chicken stock!

Two chickens, several meals, and a valuable lesson learned. It truly didn’t take much effort to feed me and my family a few wholesome meals, and it cost significantly less money than take-out. So while I’ll continue with the cookbook experiment, you’ll definitely be seeing these toss-it-together weeknight recipes as often.