Posts Tagged ‘recipe quick easy’

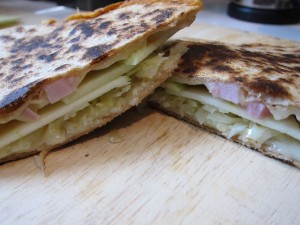
Apple, Sauerkraut, Cheddar & Ham Quesadillas

May 17th, 2010

Apple, Sauerkraut, Cheddar & Ham Quesadillas

Week 1, Day 5 of My Eating Well Challenge. I was able to sneak in a fifth recipe this week. I had some sauerkraut left over from the vegetarian reubens the day before, and ham from the ham and cheese stuffed chicken breasts. I thought this recipe sounded intriguing. OK, maybe not intriguing; honestly I thought it downright bizarre at first. But when you stop to think about it, similar ingredients are found in a choucroute garnie, so what could be bad?

As it turns out, these are spectacular. The tortilla is crispy, the cheese is gooey, the ham is smokey, and the apple and sauerkraut are tart and sweet. I added the ham per EatingWell’s recommended variation, but it could certainly be omitted if not on hand or for a vegetarian option. We had them for lunch, but cut into quarters or eighths, these would be great as a hearty hors d’oeuvre for a small party.

Apple, Sauerkraut, Cheddar & Ham Quesadillas
From The Essential EatingWell Cookbook

1 cup sauerkraut, rinsed
1/2 cup water
2 9-to-10-inch (burrito-size) flour tortillas
1 1/3 cups grated reduced-fat Cheddar cheese
1 small Granny Smith or other tart, juicy apple, peeled and very thinly sliced
3 tablespoons ham, diced small

1. Put sauerkraut and water in a medium nonreactive skillet. Gently heat just until the liquid has evaporated but not so much that the sauerkraut begins to stick to the pan. Remove from the heat.

2. Gradually heat a large cast-iron over medium heat. Put one tortilla in the pan and immediately sprinkle 1/3 cup cheese over half of it. Quickly arrange about half the apple slices over the cheese, then top with half the sauerkraut, spreading it evenly, and half the ham. Sprinkle with another 1/3 cup cheese.

3. Fold the tortilla over the filled half and press gently on it with a spatula to seal. Heat the quesadilla until the bottom is golden, about 2 minutes, then carefully flip and lightly brown the other side. Slide the quesadilla onto a cutting board and cut it into halves or quarters. Prepare the second one in the same fashion.
Blue Corn Muffins with Chile and Cheese

February 16th, 2010

In the first week of January, there was a tweet in my Twitter feed from Amy I., writer of the Playing House blog, that read, “Seriously you guys, run, don’t walk to make these chile cheese corn muffins from The Freckled Citizen.” OK, so I walked; but when I finally got there it was worth it.

These are savory muffins, with a crisp, sweet crust. The green chiles lend just a bit of heat and peppery flavor, while the corn kernels add an exciting texture and a cooling component to the spiciness of the chiles. Blue cornmeal has an earthy, less-sweet flavor than its yellow cousin, and gives the muffins a unique southwestern color. They are wonderful served as an accompaniment to chili con carne or black-bean soup, or simply on their own, warmed with a bit of cold butter for breakfast.

The original recipe is from the “Santa Fe School of Cooking Cookbook,” a book I do not own but is now high on my wish list.

Blue Corn Muffins
with Chile and Cheese

by Susan D. Curtis
From The Santa Fe School of Cooking Cookbook, Gibbs Smith, 1998
© Gibbs Smith, 1998

Yields 6 extra-large muffins, 12 large muffins, or 18 small muffins.

– 1/2 cup softened butter
– 1/2 cup sugar
– 5 large eggs
– 1/2 cup buttermilk (milk may be substituted)
– 1 cup all-purpose flour
– 1 cup blue cornmeal
– 2 teaspoons baking power
– 1 teaspoon salt
– 1 cup fresh or frozen corn kernels
– 1 cup grated Monterey Jack cheese
– 3/4 cup roasted, peeled, diced green chile*

1. Preheat oven to 375 degrees. Grease muffin tins well or insert paper liners.
2. In the bowl of an electric mixer, cream together the butter and sugar until smooth.
3. In another bowl, mix together the dry ingredients. Add the dry ingredients to the butter and sugar.
4. In a separate bowl, whisk together the eggs and buttermilk. Slowly mix wet ingredients into the dry ingredients.
5. Stir in the corn, cheese, chiles and mix well. Spoon the batter into muffin tins. Bake about 25 minutes, until just firm.

* Chiles should be prepared prior to assembling the batter. For this recipe, I used two poblano chiles. You could ramp up the heat by adding a roasted jalapeño or two. There are several ways of roasting chiles, but in this instance I pre-heated the broiler with the oven’s rack in the topmost position, then placed the peppers directly under the heating element. I turned the peppers with tongs occasionally, and carefully, until they were blistered and black on all sides, then removed them from the oven. When they were cool enough to handle, I removed the blackened skin, stem, and seeds, and diced the flesh. -taetopia

Peanut Noodles

November 18th, 2009

peanut_noodles

I am forever on the lookout for quick and easy recipes that can be made on a weeknight after work when I want something relatively healthy and inexpensive. One of my favorite resources for these recipes is Eating Well.

This recipe was inspired by Eating Well’s recipe for Peanut-Ginger Noodles. I’ve bumped up some of the aromatics, and changed the vegetables to my taste. I can’t imagine a vegetable that wouldn’t be good here. I shied away from using whole wheat pasta and went with a high-fiber pasta instead. There are some instances where I didn’t want the nutty flavor of whole wheat pasta to clash with whatever sauce I’m making.

This dish is very filling. Its got great textures – the crunchiness of the vegetables, the chew of the pasta, the creaminess of the sauce – and great flavors – the heat from the ginger, and the comfort-foodiness of peanut butter. This recipe makes enough for dinner with plenty leftover for the next day.

– 1/2 cup creamy peanut butter
– 2 tablespoons soy sauce
– 3 teaspoons minced garlic
– 2 teaspoons Asian chile-garlic sauce
– 2 teaspoons minced fresh ginger
– 8 ounces high-fiber spaghetti
– Two cups julienne (thinly sliced) combination of carrot, red pepper, and snow peas
– 2 tablespoons thinly sliced scallions, green/dark green parts

1. Bring a large pot of water to boil for the pasta.

2. Mix together the peanut butter, soy sauce, garlic, chile-garlic sauce, and ginger in a large bowl. Set aside while you make the pasta.

3. Salt the boiling water if desired and cook the pasta until it is just slightly underdone, then add the vegetables to the water. Cook a minute or two more until the pasta is done, and drain the pasta and vegetables in a colander, rinse with cold water to stop the cooking, and continue to drain well.

4. Add the pasta and vegetables to the bowl with the sauce, add the scallions, and toss thoroughly. Note that it will look like you have too much sauce to start with, but have no fear! Place the bowl in the refrigerator for about an hour, tossing the noodles every 20 minutes or so. The sauce will become thick and cling to the pasta. Serve cool, or it may be warmed in the microwave a few seconds if you prefer.