Rob’s Bistro
75 Main Street
Madison, NJ
973-377-0067
http://robsbistro.com/
Rob’s Bistro opened in December of 2009. The restaurant is the brainchild of Chef Rob Ubhaus, chef and owner of the excellent Resto, which I wrote about in October. Chef Ubhaus seems to have a knack for knowing what Madison needs and filling the gap, or perhaps he is simply in the right place at the right time. Either way, Rob’s Bistro is a new concept for the area (if one disregards The Show Bistro that lived a very short life in Chatham a few years back), providing the neighborhood with a very fine traditional French bistro.
Decor and Ambiance:
Rob’s Bistro is in the space formerly occupied by the satisfactory but rather blah Terre Mare, and directly next door to Resto, the similar signage reflecting the relationship of the two restaurants. Chef Ubhaus has removed the imposing stucco frontage, replacing it with full glass windows. The interior is inviting in warm earth-tones, featuring wood tables and chairs, with unfussy table settings with stemless glassware.
On the walls are oil landscapes in pastel pallettes by the same artist whose paintings are featured in Resto; an artist I’m not over the moon about to begin with. They’re not distracting, just rather boring, especially having seen the same numerous times in the sister restaurant. I would have preferred photographs of French bistro life perhaps, or paintings by a different artist. This is truly a minor distraction however. When the menu arrives, pretty much all else is forgotten.
Our Menu (from various lunches and dinner):
Appetizers:
– Soupe à l’oignon gratinée
– Soupe du jour (cauliflower)
– Cheese & charcuterie platter
– Chèvre & caramelized onion tart
Entrees/Sides:
– Seared chicken breast salade – frisée, lardons, fines herbs, dijon vinaigrette
– Rob’s Bistro burger – bacon, caramelized onions, Les Freres cheese
– Croque monsieur
– Jambon & gruyère crêpe
– House roasted turkey and brie crêpe – granny smith apples
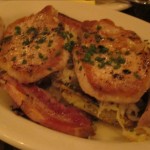
– Coucroute garnie – pork, bacon, and sauerkraut
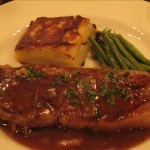
– Entrecôte – rosemary potato gratin
– Buttered noodles
Desserts:
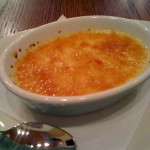
– Crème brûlée
– Chocolate mousse
Visit their website for the full menu.
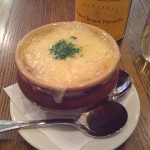
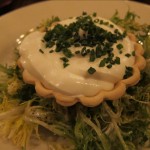
Pictured left to right: soupe à l’oignon gratinée; chèvre and caramelized onion tart; coucroute garnie; entrecôte; crème brûlée.

Degustation:
Rob’s Bistro serves the best French onion soup I’ve had in a long time. Possibly ever. The broth itself is well-seasoned, meaty and a touch herbaceous, with a beautifully rich texture. The cheese is melted, not darkly browned, so that it is easier to eat than when one comes up with a clump of cheese that was broiled into one solid mass, as I’ve found is typical of most restaurants. Not that there’s anything wrong with that, it’s just that this way you are able to enjoy separate bites of warm, soft cheese, and maintain a bit of decorum.
The cheese and charcuterie platter presented a very nice variety when we had it – three cheeses and a couple of dried sausage, with the typical garnish of country mustard and cornichons. I imagine the cheese and meats will change depending on what is available and at the chef’s discretion. I would have preferred that the toast that came with it be a bit thicker or the cheese softer. Spreading cheese on the thin pieces of toasted baguette was impossible, but that did not stop us from devouring every morsel.
The chèvre and carmelized onion tart is distinctly different than other cheese and onion tart I’ve tasted. The firm pastry crust is a sturdy container for sweet, thinly sliced, caramelized onions, which are then topped with a cool and incredibly creamy goat cheese. It comes atop a salad of chopped frisée, which is a nice peppery foil for the sweetness of the onions and cheese.
The highlights of the entrees we sampled go to the Bistro burger, a deliciously moist and distinctly home-made style hamburger; the fresh house-roasted turkey crêpe with caramelized onions and granny smith apple, which is perfectly sweet and savory; and the entrecôte, a beautifully tender, juicy cut of beef.
While the entrecôte and the pork of the choucroute were nicely seared, I found them a bit under-salted. However, this is personal preference. I tend to season meat with reckless abandon.
Even more delicious than the noted entrees were two of the sides. The rosemary potato gratin, which was served with the entrecôte, is hands down the best gratin I have ever been served. It is well scented with rosemary, with a creamy, tooth-giving texture enveloped by a parchment-crisp crust. The buttered noodles were plain buttered egg noodles, but so well seasoned with parsley and pepper that it could have been an entree (which, as it turns out, is indeed often served to children as a main course). Both sides may be ordered on their own from the sides selections of the dinner menu.
I will need to make a few more trips to get to some more of the desserts, as I tend to be a glutton for the savory stuff, but I highly recommend the crème brûlée. There’s just the right amount of custard, while the sugar is delightfully thin and breaks with a satisfying crack. I overheard that the tarte tatin is made-to-order, and is definitely on my wish list.
Service:
The host, while a perfectly nice gentlemen, seems a bit lost in his role. It’s as if he can do only one thing at a time, and is not entirely sure what that one thing should be. He is genuinely concerned that the customers are enjoying their experience, but that’s pretty much where his involvement ends. I have seen him bus a table or two on occasion (there is no busser, only the servers and the host), but not nearly lend his hand to the dining room as he could have, which I find mildly frustrating to observe.
The servers however, we have met four, are great (although one of them, as well as the host, make the cringe-inducing error of calling me and my guest “guys”). They are willing to take time to discuss the menu and customer preferences. There is one woman, Lisa, whose service impresses me greatly. During service she is always there, but never hovering, and seems to know what you need almost before you need it. In my opinion, servers like that are worth their weight in gold, and I hope she has a long and successful career with Chef Ubhaus.
End:
Rob’s Bistro gives a high-end impression in a comfortable atmosphere. It is not inexpensive, as dinner entrees hover in the $20 range, but the experience and food are worth it, and the fact that it’s a BYO makes it that much less expensive than it could be. Lunch prices are quite reasonable.
The downside is that there is no lunch service on Saturday, though beginning in a few weeks there will be a Sunday brunch. Reservations for dinner are strongly recommended, as my guest and I watched the place fill up on a Wednesday night to capacity. Children are welcome, but the crowd tends to lean toward the older set.
Rob’s Bistro is sure to become our personal choice for casual dining in Madison. It’s an absolute delight.
 When I was a child and young teen, among my favorite dishes were my mother’s beef stew and Yankee pot roast. My mother is a fantastic cook all around, and in those days, as a single mother working long hours, with both of us hating the chill of winter, braises took care of three essentials: Less time in the kitchen, plenty of leftovers to eat for the week, and the warming of our bones. I’m not certain she made braises for that purpose consciously, it’s just common sense. About braises, these essentials hold true.


 I know that there are people who can whip up a batch of biscuits with butter or lard in a few moments flat. I am not one of them. I have “hot hands,” which means that the moment a stick of butter knows that it is going to be touched by me, my hands burst into blames which then instantly melts the butter. It’s like having an undesired superhero power, and which, needless to say, makes an awful mess. So when I saw this recipe for
  Cream Biscuits
 Over the years I have surrounded myself with wonderful cookbooks. Cookbooks that for some reason I never cook from. I love to own them and read them, but I never seem to get around to actually using them as often as I should. I usually get an idea in my head, assemble the ingredients at the market, and throw it all together at home with, I am happy to say, better-than-passable results. I think it has something to do with my natural desire for immediate gratification, combined with my irrational fear of recipes that begin with the words “Day One.”
 A note on the recipe: The author doesn’t say exactly how you’re supposed to get the crackly phyllo dough into the edges of the tart pan. Just squish ’em in. It’ll work out just fine. Also, a spray bottle of olive oil works wonders in place of a brush. There’s much less of a chance you’ll break your dough.
 Winter Squash and Leek Pie
 My boss has a tradition of buying or making the employees in her department whatever kind of cake they want for their birthday. She’s pretty awesome that way. So the first year I worked for her, I asked her what her favorite cake was, and she replied, “German Chocolate Cake.”
 A couple of weeks ago I began hearing
  Jersey City’s Journal Square is a pretty beat up neighborhood. There’s barely a hint of the metropolitan city it used to be, except for the two majestic, well-preserved movie houses, one of which serves as a meeting hall for Jehovah’s Witnesses. It is a major transportation hub, with both a PATH station that runs to Newark and New York, as well as a large bus terminal, and there is a community college. It is a busy neighborhood, but not a particularly nice one. The massive improvements made downtown since 9/11 have yet to stretch to this part of the city.

